
- Oleander benefits from these types of pruning
- Plant pruning in stages stimulates dense branching
- Plant pruning ties in with the law of top promotion
- Oleander benefits from a stable basic structure - tips for the growth pruning
- Instructions for the shape and maintenance cut
- Use ground shoots for propagation
- A summer pruning promotes a long flowering period
- Makeover with the secateurs - that's how it works
- Deriving is better than rejuvenating
- Raising oleanders to be high stems - this is how it works
- frequently asked Questions
North of the Alps, a frost-sensitive oleander thrives as a container plant to transform balconies and terraces into a picturesque sea of blossoms. The combination of plenty of sun, water and nutrients alone does not guarantee a long-lasting flowering period and a dense foliage. The Mediterranean flower fairy tale is also closely related to the right cut care. This tutorial explains when and how to properly cut Nerium oleander.
 Gloves should be worn when cutting oleanders
Table of Contents
Show all- Types of cuts with appointments
- plant cutting
- build-up cut
- Shape and maintenance cut
- care cut
- taper cut
- Training cut high stem
- frequently asked Questions
- After planting, cut off the central shoot above the third leaf rosette from the bottom
- Allow unhindered growth for the following 12 months
- A year later, in March/April, shorten the branches in the upper half of the plant above the third leaf rosette
- Cut off the shoots in the lower half of the plant above the fourth leaf rosette
- Clean out faded flowers
- Cut out dead, criss-crossing, or inward-growing branches
- Cut back branches that are too long until just above the next bud or a healthy leaf rosette
- Arching overhanging shoots lead to a young side branch
- Remove branches near the ground that hang over the edge of the bucket
- From the sixth year, cut off 2 to 3 of the oldest shoots at the base
- The best time is in spring, as soon as budding begins
- Start by thinning out all dead branches
- Then cut back the remaining shoots to 10 to 30 centimeters
- Ideally cut a few millimeters above a rosette of leaves or dormant eyes
- Cut off all side branches from the central shoot
- Insert a support rod with the length of the desired stem height into the ground next to the central shoot
- Fix the center drive to the support rod with hose clamps
- Thread the center drive step by step onto the support rod
- Continuously cut off all side shoots to encourage growth in height and thickness
Oleander benefits from these types of pruning
Oleander doesn't blame its gardener for any pruning measures. On the contrary, the Mediterranean ornamental tree reacts positively to expert pruning. The key to success is the right combination of cutting style and timing. The following table lists the most promising types of cuts with appointments:
| cut type | aim | Appointment Option I | Appointment option II |
|---|---|---|---|
| plant cutting | dense branching at the base of the bush | first stage after planting | second stage a year later in March/April |
| build-up cut | build a stable framework | before granting in the third and fourth year | in March/April of the third and fourth year |
| Shape and maintenance cut | regular growth, lush flowering, dense foliage | in the fall before clearing | in March or just before clearing out |
| care cut | Extend flowering time, preserve shape | as needed during the growing season | none |
| taper cut | revitalize overaged, bare oleanders | in spring at the beginning of budding | none |
| Training cut high stem | Development of a young plant into a standard | after planting | before clearing |
Plant pruning in stages stimulates dense branching
Do not be tempted to buy cheap, bushy oleander plants from discounters. These come from a loveless mass production. Here, ten or more cuttings are crammed into a small pot to simulate dense bushy growth. The end of the story are confusing, predominantly herbaceous plants on which pruning measures are difficult or impossible.
The most valuable oleanders are grown from a cutting and have the first, short side shoots. A bold pruning of the plant is aimed at the formation of a number of new shoots at the base of the plant, which form a stable shoot structure. As the illustrations below illustrate, the perfect pruning of plants takes place in two stages:
The pruning was a complete success when an oleander has developed a well wooded and richly branched base by the beginning of the third year. Parallel to the growth in height and width, the shrub will not bare from below in the future because new shoots will sprout from the rootstock again and again.

Shorten the central shoot above the third rosette of leaves immediately after planting. The omission of the top bud encourages branching at the base of the shrub.

At the beginning of the second year, cut off the upper twigs above the third and the lower twigs above the fourth leaf rosette.
background
Plant pruning ties in with the law of top promotion
The precise prediction of the reaction to pruning is based on one of the three laws of growth that every home gardener should be familiar with. The law of top promotion is based on the fact that on any plant, the bud in the highest position will sprout the strongest. Because the vegetation point is closest to the light, the sap pressure at this point is disproportionately stronger than at all other nodes. If the top bud is removed as part of the plant pruning, the growth forces are distributed to lower-lying buds. The result is a permanent increase in growth at the base of the plant.Oleander benefits from a stable basic structure - tips for the growth pruning
A professional pruning also results in the growth of fresh ground shoots from the root ball. By using this process wisely for further development, you direct the young oleander into the perfect shrub shape. Therefore, to complement the central shoot, choose the seven to ten most promising bottom shoots as a framework. Shorten all other shoots from the root ball at ground level.
Instructions for the shape and maintenance cut
For an oleander north of the Alps, the winter period begins in mid to late November. In connection with the granting, a pruning is part of the care program if there is a lack of space in the winter quarters. Spring is the best time to prune, just before new growth begins. If you do not have to complain about space problems for the winter, subject your oleander to the shape and maintenance cut later. With this cut you do it right:
When pruning, please note that an oleander blooms in early summer on the buds that it planted the previous year. Its flowering splendor in midsummer comes from the buds on this year's shoots. A moderate approach to pruning should spare the overwintered buds. A ground shoot remains vital and floriferous for 5 to 8 years. The continuous rejuvenation by thinning out the oldest shoots on the ground therefore begins in the sixth year at the earliest.
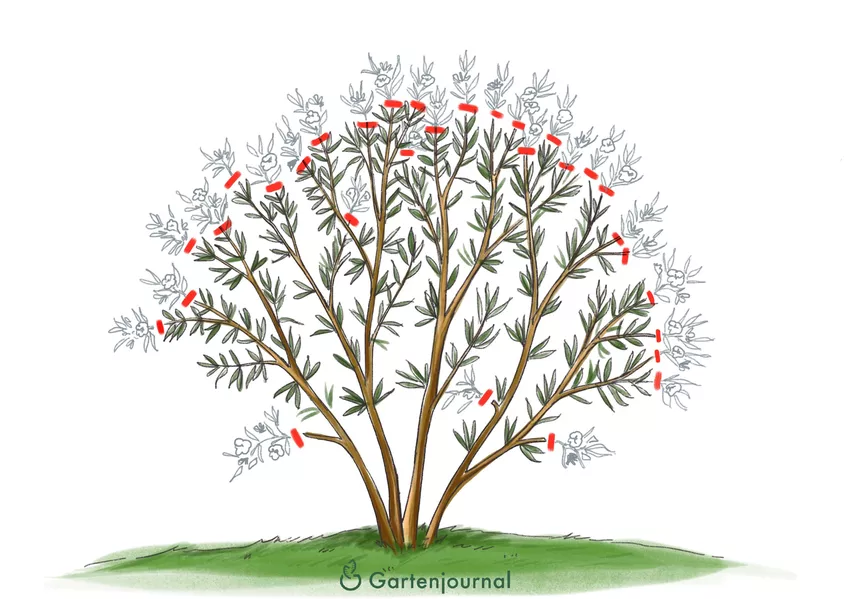
Before storing, cut off any dead flowers. Branches that are too long lead you to a young, unbranched side shoot. Thin out the oldest shoots on the ground to promote fresh shoots.
digression
Use ground shoots for propagation
During the annual pruning, do not cut off all the shoots close to the ground. These are natural sinkers that help oleanders to reproduce in their native regions. You use a ground drive for the offspring by placing a pot filled with potting soil next to the oleander pot. Place the shoot on the substrate and lightly scratch the bark at the contact point. Weight down the sinker with a stone to improve ground contact. The mother plant continues to provide nutrients to the shoot while it develops its own root system. The two plants are separated when the offspring has largely rooted its seed pot.A summer pruning promotes a long flowering period
Continuously cut off wilted flowers as the summer progresses. Shorten fully faded shoots by a third. Place the scissors at a short distance from a bud or a whorl of leaves. With a care cut you contribute significantly to a never-ending flowering period. Regular trimming and moderate pruning prevents the oleander from the exhausting process of seed and fruit formation. Instead, the plant focuses on producing new buds and blooms until fall.
Makeover with the secateurs - that's how it works
Old, rarely cut oleanders are often bare. The trees only have leaves at the ends of the branches, so that they are reminiscent of a skeleton. It doesn't have to come to that if you take countermeasures in good time by way of a rejuvenation cure. The most radical of all types of cuts aims at revitalization and paves the way for a new construction. Since oleanders have the ability to sprout fresh from old wood, there are good chances of success. This is how the rejuvenation cut succeeds:
After the rejuvenation cut, your oleander will be grateful if you repot it promptly. The change to fresh substrate awakens the floral spirits, which drives the budding out of the old wood of the rootstock. In the following two to three weeks, the plant can recover from the hardships in a partially shaded, warm location. Only after regeneration should the rejuvenated oleander be cleared out, weather conditions permitting. Please note that a radical rejuvenation cut will result in the failure of this year's flowering.
background
Deriving is better than rejuvenating
A radical rejuvenation pruning puts your oleander to the test. It's tricky to put a native shrub on the stick. If you take this measure on ornamental trees from distant countries, renewed budding is questionable. As long as your rose laurel has one or two young side shoots, you should use a diversion pruning instead. For this purpose, shorten old and overly long branches to an unbranched, young side branch in the lower shoot region. Use scissors or saws exactly where old and young fork. The young wood takes the lead, benefits from the increased sap pressure and sprout vigorously.Raising oleanders to be high stems - this is how it works
As a standard, oleander is a feast for the eyes and much in demand. Completely trained plants are expensive because the construction work is very time-consuming. Reason enough for the enthusiastic hobby gardener to take on the demanding project himself. A young oleander with a strong central shoot offers the best starting point. This is how the upbringing cut to a high stem succeeds in an exemplary manner:
If the top bud is three to four leaves above the desired crown height, the shoot tip is cut. In accordance with the growth law of peak production, this cut initiates the branching to the crown. Select the strongest side shoots as crown shoots and shorten them to three leaf whorls. As a result, a spherical crown of oleanders with lots of flowers is formed.
frequently asked Questions
Is oleander poisonous?
The highly toxic cardiac glycoside oleandrin significantly limits the enjoyment of the opulent oleander. Even a small amount of 15 to 20 grams of fresh oleander leaves is enough for an adult to trigger acute symptoms of poisoning, such as cramps, nausea and severe vomiting. Cardiac arrhythmias are common and can be fatal without medical intervention. A tiny dose of oleandrin is life-threatening to children and pets. Only include an oleander in the design plan if children and animals cannot access the plant. For all care and cutting work, please protect yourself with suitable clothing, gloves and safety goggles.
In winter, oleanders are prey to scale insects that sit in hordes on the leaves. What can I do?
Your oleander is counted with a heavy scale infestation. As an immediate measure, shower the plant with as strong a jet of water as possible. Cut off the shoots that are still the most affected. Twigs less heavily infested with scale insects should be left standing so that the next flowering period does not fail completely. Fight the rabble with a solution of 1-2 tablespoons of pure soft soap (44.90€) per 1 liter of lime-free water and 1-2 dashes of spirit. Regularly wiping off the pests with a cloth soaked in alcohol is helpful.
What to do with oleander clippings?
All parts of the oleander plant contain highly toxic oleandrin, which is fatal to humans and animals even in small amounts. The clippings therefore have no place on the compost heap. Place cut branches, plucked leaves and wilted flowers in the organic waste bin. If excess clippings result from a taper cut, place them in a sturdy sack and take them to the nearest waste disposal facility. Please do not bury the leftovers so that moles and other underground garden dwellers do not fall victim to the toxin.
The 3 most common cutting mistakes
If an oleander is only vaguely reminiscent of a lavish flowering shrub, the cause is usually to be found in incorrect pruning. If you can rule out location deficits, pest infestation and diseases, please consult the following table with the 3 most common pruning errors, typical damage patterns and tips for prevention or correction:
| cutting error | damage picture | Prevention/Correction |
|---|---|---|
| no plant cutting | bare shrub base | Cut back after planting and the following year |
| never cleared | premature defoliation to a leafless skeleton | Thin out dead wood and transverse branches once a year |
| withered flowers not trimmed | short flowering period and growth of poisonous fruits | Continuously shorten faded shoots |
tips
Oleander's good-natured pruning tolerance extends to the roots. If you repot the flowering bush in spring, you can use the previous bucket again. A root cut ensures that the capacity is sufficient for another year. To do this, use a sharp knife to reduce the size of the root ball at the side and bottom. Please only resort to root pruning if no further growth in height and width is desired for your oleander.